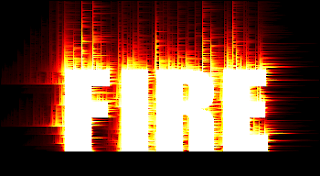
Photoshop has been an amazing one among us as its easiness to edit photos/ images. Most of the photographers use Photoshop to make their photographs most perfect as they wish. I have been working as a designer along with my study. And I got many tricky ways to make many effects and use many options. By this article my aim is to inculcate you a new idea to make an original fire effect on Photoshop.
Below are some more steps , I hope which could really help you
Photoshop
Photoshop is a software developed by Adobe company, thus it is also called Adobe Photoshop. Adobe has also launched other editing software like Adobe Flash, Adobe Illustrator,etc. Photoshop is used worldwide because it is very comfort and useful. Most of the software/ App interfaces are designed with Photoshop. It is simple and humble to learn it.
Effects on Photoshop
In the side of an editing software, effects are the changes/ alterations applied for a Video/ Image or any other file. Here Photoshop can be used to edit photos and to design Brochure, Notice, Flex, etc. And whenever we design we use so many effects and filters on the Photoshop.
As I got some hits from the internet I tried some thing with Photoshop. Actually this effect is not a result of a risky and deliberate work. Normally many ready made effects can be applied and many other effects are made manually by designers, which need a good experience. But this effect can be done by following some simple steps, even if you are a firs user of Photoshop.Fire Effect
Below are some more steps , I hope which could really help you
- Open Photoshop and then go to Files >> new
- Now you will be asked for the size of the new window (size eg: width=6; inch hight 3 inch; resolusion: 72;RGB mode)
- Fill black color at the background -( D, Alt+ BackSpace). Then Write anything in white colour (Eg: Fire)
- Now we have to Apply the text an effect/ Filter called wind
- Filter > Stylize > Wind
- Wind can only apply to the left direction, but we want to apply to left, right & top directions, so we have to rotate the picture to apply the effect
- Image > Rotate Canvas > 90 CCW
- Ctrl + F ( Repeat last applied filter)
- Image > Rotate Canvas > 90 CCW
- Ctrl + F
- Image > Rotate Canvas > 180
- Now we have applied wind on all sides.
- The real magic starts here
- Change your image to the in given order (see below screenshot)
- Image > Mode > RGB Color
- Image > Mode > Grayscale
- Image > Mode > Indexed Color
- Image > Mode > Color Table
- When you change the mode into Color Table you will see a color Table. And from which select Black Body (as shown in image)
- Press OK
- Now you will get your picture as shown below

- This should be rippled, thus it would get a real effect
- Now we have to change the Image Mode back to RGB before get ripped
- Filter > Distort > Ripple (See screenshot)
- Congratulations... YOU ARE DONE.!!
Hope this is helpful.. Feel free to leave your doubts as comments.
...


0 comments:
Post a Comment